
As I’ve been moving through my Ph.D, the use of GIS systems has become increasingly important to process the data I have been collecting or have been given. Unfortunately for myself, it has been a while since I had to use GIS tools to their full effect with my undergraduate degree teaching me very briefly how to create a polygon in ArcGIS in my first and second year. That was 4 years ago. Since then I have barely used ArcGIS, and thus have forgotten the basics. In my frustration I turned to Google, that all-knowing tool of wisdom, to help me through my state of amnesia but was left feeling more frustrated than when I started. The lack of illustrated guides became apparent, even on Youtube, as I sifted through the seemingly endless buttons and sub-menus that ArcGIS had to offer.
So, to save time for others who may have indeed forgotten how to create a polygon, I have put together a short guide on how to not only create a polygon, but also how to cut or clip the data within that polygon. Ideally at this point you will know how to import your basemap and/or generate a difference map (Search for Map Algebra for generating difference maps, you literally subtract one map from the other). If not, let me know, and I can direct you to an appropriate guide or even write another illustrated guide myself.
How to draw polygons in ArcMap
- In Arc Catalog, select an appropriate folder in which to work. Make sure the basemap or difference map and the polygon are in the same folder.
- Right click on your chosen work folder and select “New > Shapefile > Polygon” and give it a sensible name (Below).


- Open the Editor toolbar if it is not already open and click “Start Editing”. On the right-hand side of the Editor toolbar is a “Create Features” button (Below).

- When you click it, it opens a window that allows you to select the feature you wish to draw onto your map (Below).

- Then it is simply a case of tracing the outer edge of the feature you wish to retain. In this case, a turbidity current event on a difference map. Once you are done, double click to finish the polygon. The edge of the polygon will turn blue to indicate that this was successful.

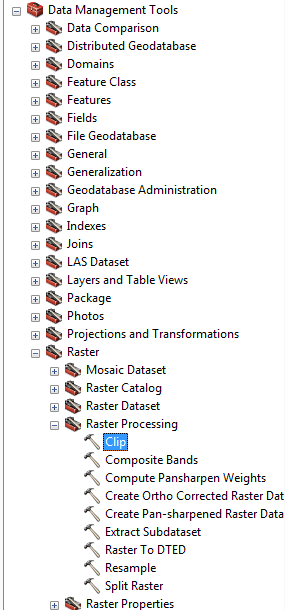
- Now to clip the data so that you’re left with the turbidity current event, and not the whole difference map. In Arc Toolbox you need to find Datamanagement Tools > Raster > Raster Processing > Clip (Below).
- In this menu you will have to select the input raster (the difference map or base map that you’re using) and the output extent, which is the polygon you just created. Check the “Use Input Features for Clipping Geometry” and “Maintain Clipping Extent” boxes and click “Ok”.

- Once this is done, you will be left with the clipped difference/base map which you can export as a TIFF for use in Matlab, or carry on working on in ArcGIS. Good job!

If you have any questions at all, please do not hesitate to leave a comment or conact me.
